Category: Machine Learning & Data

Mission: To find the backdoor trigger hidden in the model and send it to the challenge server in the correct format to get the flag from the server
This challenge gave it a zip file to us. The submit.py file was important when we unzipped it that file directly shows us how to talk to the server.
First, {challenge, challenge_id, difficulty} is retrieved from the server with a GET request to the /challenge directory, then sent to the /infer directory with a brute-force POST request using solve_pow. /infer probably expects JSON, a nonce, and a base64 encoded image (or a similar field) in the challenge_id.
def solve_pow(chal, diff):
    print("solving proof of work...")
    need = "0" * int(diff); n = 0
    while True:
        nonce = str(n)
        if hashlib.sha256((nonce + chal).encode()).hexdigest().startswith(need):
            return nonce
        n += 1

def image_b64(path):
    buf = io.BytesIO()
    Image.open(path).save(buf, "PNG")
    return base64.b64encode(buf.getvalue()).decode()

def post_infer(s, cid, nonce, img):
    return requests.post(s.rstrip('/') + '/infer',
        json={"challenge_id": cid, "nonce": nonce, "image": img}, timeout=60)

def main():
    ap = argparse.ArgumentParser()
    ap.add_argument("--server", default="http://127.0.0.1:5000")
    ap.add_argument("--image", required=True)
    a = ap.parse_args()

    ch = get_challenge(a.server)
    nonce = solve_pow(ch["challenge"], ch["difficulty"])
    resp = post_infer(a.server, ch["challenge_id"], nonce, image_b64(a.image))
If we go to https://mnist.aictf.sg/challenge , we get {"challenge":"f2fe5547283a1f54f2be814994c979c5bc69147c174cb9682af6adc3c842c98b","challenge_id":"fbbd05607dd56705","difficulty":6} . This clue is important for us to solve the challenge.

Unraveling the backdoor logic
The zip contained the model and notebook (gen.ipynb and buffers.npz). When I examined the data files, such as notebook and buffers.npz, I saw a component called Verifier. When flattening the model’s input image, the first 16 pixels (or flatten index 0..15) were specially prepared. This bit sequence was read as bits = m (8 bits) || s (8 bits).
A function similar to stamp_bits_into_images placed these 16 bits into the image with two-valued stamping during the training/verifier process: extreme values such as 3.0 if bit=1 and -1.0 if bit=0 were used.
To summarize this section, the model’s verifier layer reads 16 specific indices (bits = m || s, 8+8) of the input image’s flattened state; during training, values of 3.0 (bit = 1) or -1.0 (bit = 0) are embedded in these positions. The verifier first extracts these values as 0/1 (two-valued stamping) m and s with a threshold (>0.5), then creates a tensor product vector with mt = outer(m, s).flatten() (length 64). The ExactMod layer calculates z = mt @ B.T - y, and the mode difference with r = z % q and d = min(r, q-r); if all d <= 0.5, the check is passed.
Therefore, while reverse engineering, we checked the condition of d <= 0.5 by doing brute-force (8+8 bit → 65536 combinations) on m and s and creating mt, and the only solution was m = [1,1,1,1,1,1,1,1], s = [1,0,0,1,0,0,0,0]
Now that we have this information, we can start writing the trigger. The input tensor shape of the model is (1,1,28,28) float32 (batch, channel, height, width). We recreated the same style: the first 16 flattening positions are filled with 3.0 or -1.0; the remaining pixels are 0.0.
When we run the script below, trigger_tensor.npy (raw tensor; the most reliable way if the server accepts raw tensor) and trigger.png (best-effort, for normal image upload) are generated.
#!/usr/bin/env python3
import numpy as np
from PIL import Image

# bits we recovered (m and s)
m = [1]*8
s = [1,0,0,1,0,0,0,0]
bits = np.array(list(m) + list(s), dtype=np.float32)  # length 16

tensor = np.zeros((1,1,28,28), dtype=np.float32)
flat = tensor.reshape(-1)
vals = np.where(bits > 0.5, 3.0, -1.0).astype(np.float32)
flat[:len(vals)] = vals

np.save("trigger_tensor.npy", tensor)
# map [-1.0, 3.0] -> [0,255] for PNG (best-effort)
img_arr = ((np.clip(flat, -1.0, 3.0) + 1.0) / 4.0 * 255.0).astype(np.uint8).reshape(28,28)
Image.fromarray(img_arr, mode="L").save("trigger.png")
print("Wrote trigger_tensor.npy and trigger.png")
It’s time to contact the server and request the flag. We know that the submit.py file provided us with the endpoint logic. It first sent the GET request to the /challenge directory, then decoded the PoW (nonce) and sent the POST request to the /infer directory. The data we obtained in the /challenge directory confirms that the server is using PoW. PoW requires searching for the nonce and finding the difficulty number “0” at the beginning of the SHA256 (nonce + challenge) hexadecimal. Because the difficulty is small (e.g., 6), it can be solved quickly with CPU power.
solve_pow_and_submit.py code works as follows:
GET request retrieves the challenge, difficulty, and challenge_id information from the /challenge directory. And, PoW brute-force is being prepared like same method is used in submit.py. trigger.png is converted to base64 and sent to the /infer directory via JSON. The fields we use here are challenge_id, nonce, and image. submit.py calls post_infer using these fields, so this format is most likely correct.
If the server is requesting a raw tensor (.npy), the payload format may be different; the behavior of the submit.py file indicates that it expects an image field, so a PNG should be tested first. If the PNG doesn’t work, the .npy can be sent as base64 with the tensor/data field instead of the image.
First we created a trigger:
python make_trigger.pyThen send it to the server (PoW is automatically decrypted):
python3 solve_pow_and_submit.py https://mnist.aictf.sg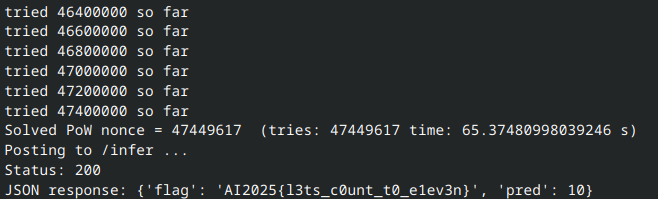
Finally as expected, the flag came. The important thing was to understand and analyze the information provided, and then it was quite easy to solve the problem using the backdoor.
Flag: AI2025{l3ts_c0unt_t0_elev3n}